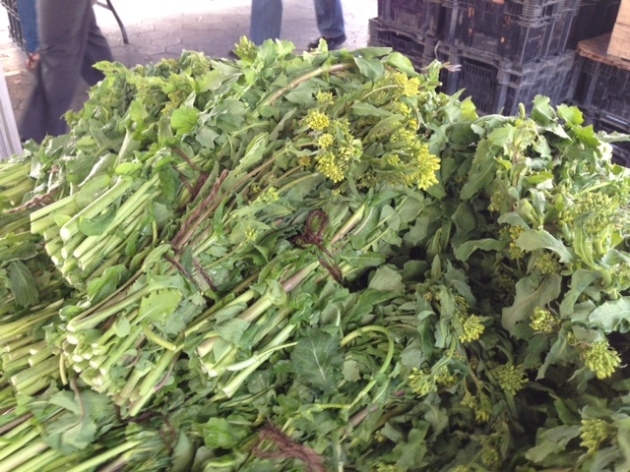
The Walking Dead Broccoli Rabe

ImageThe Walking Dead Broccoli Rabe

“These should have died, but they somehow survived.” said the farmer.

Several farmers here in NYC are offering incredibly flavorful greens that survived multiple winter frosts and snowstorms to emerge even sweeter than they were before. They are the delicious undead veggies of the farmers market. One farmer explained that many winter vegetables like carrots and parsnips are so sweet because they have to work so hard in the cold weather and that ‘work’ produces sugar. But some greens, like broccoli rabe, that are normally more vegetal, work hard enough to survive the winter and develop the same kind of sweetness.

The taste is hard to describe but if you can imagine the freshest tasting green you’ve ever tasted and then add a little hint of an almost honey-like sweetness, that’s pretty close.

I like to balance the sweetness with the heat of chili flakes and I like to use a touch of sherry vinegar for some acid. But truly you don’t have to do much to make this stuff taste delicious and I ate several leaves raw on the way home from the market and they were great.

So ask around at your local market and see if anyone has any wintered greens left over. If you can find them, you’re in for a treat. If not, sit tight. Hunker down and watch out for The Governor.

Wintered Broccoli Rabe with Chili Flakes and Sherry Vinegar

Farmers Market Bill $4/4 Servings ($1/serving)

Heat 2 tablespoons of olive oil in large skillet over low heat

Add 2 cloves of sliced garlic a pinch of chili flakes

Keep the heat low as you’re actually making a garlic/chili oil while you prep the rabe

Rinse and chop 1 head of wintered broccoli rabe

Remove garlic slices with a slotted spoon and increase heat to medium-high

Saute rabe for 5-7 minutes

Add a generous pinch of salt and some black pepper, 1.5 tablespoons of sherry vinegar and return garlic slices to pan

Toss together and taste for seasoning. If desired, add more chili flakes or salt and pepper.

New Haven Style Clam Pizza (from Behind Enemy Lines)

Image

New Yorkers are proud of their pizza. There are good slices to be had on corners in the Village, amazing pies to be found throughout most of Brooklyn and upscale pizzas served in trendy restaurants with hipster waiters promising that their crusts are ‘bold and festive.’

But 90 miles away in New Haven, there is an even more intense, albeit smaller pizza pride movement. Indeed the clam pies at New Haven’s legendary Pepe’s are truly remarkable. The pizza is not cheese-heavy and the flavor hints of the very best Pasta alle Vongole you’ve ever tasted. Garlicy, buttery and briny at the same time but with a chewy crust. I’m afraid to sing the praises of New Haven’s pizza while only 3 blocks away from one of New York’s most intense pizza joints which has had a line out the door for the last 25 years but sometimes, I prefer New Haven style pies. And I like them even more when they’re made at home with local ingredients.

I had been playing around with Mario Batali’s pizza crust recipe using local honey to add the tiniest bit of sweetness to the dough. And don’t get me started on local clams. They are one of most affordable ways to make a top-tier local meal at home. And because a good clam pie has only a little cheese, it’s an ideal way to showcase firmer, sharper, local cheeses.

So get that pizza stone in the oven and get ready for what could be…hang on…someone’s coming. I mean “New York has the best pizza in the world! I love it. I don’t like anything else.”

New Haven Style Clam Pizza (from Behind Enemy Lines)

Farmers Market Bill $7/2 servings = $3.50/serving

Make enough pizza dough using your favorite recipe to make 2 large or 4 small pizzas

Roll out pizza into an 8-9 inch round

Preheat pizza stone to 500 (or 550 if possible) for half an hour

Coarsely chop 3 cloves of garlic

Steam a dozen small clams in a half-cup of water and reserve cooking liquid

Remove clams from shell and set aside

Add 1 and 1/2  tablespoons of butter to clam cooking liquid and stir in chopped garlic

Grate a half-cup of firm, local pecorino or other sharp cheese

Dust pizza peel with a small handful of cornmeal

Place crust on pizza peel

Sprinkle cheese on top along with a pinch of salt

Spoon clams on top of cheese and drizzle butter/garlic mixture over the top

Place pizza on stone

Bake pizza for 6 minutes or until brown on top

Serve with a local IPA or red ale

Interim Salad with Apples, Red Onion and Goat Cheese: It’s So Hard to Say Goodbye to Cold Storage Fruits and Vegetables

Interim Salad with Apples, Red Onion and Goat Cheese: It’s So Hard to Say Goodbye to Cold Storage Fruits and Vegetables

Have you ever upgraded to a nicer version of something and then missed the old one a little bit? The new video games are impressive but I do occasionally miss the days when  Mario and Luigi were two-dimensional. My father recently got a Smartphone and remarked that it had ‘an awful lot of buttons compared to the old one.’

Most of the farmers markets in the US are about to be flooded with what most people consider the best vegetables of the year. It will start with pea shoots and some greens and then move into peas, asparagus, and artichokes. The corn and tomatoes will come in for the finale and stay for some time before local eaters go back to cold storage fruits and vegetables.

I’ve certainly eaten my fill of parsnips and potatoes this year and I was ready to splurge on some of the beautiful greenhouse greens at the market to tide me over until the spring veggies come out. In a way, I wanted to speed up the arrival of spring. I found amazing microgreens and fresh goat cheese from Lynnhaven, my favorite goat cheese producer in NY. But on the way out of the market, I started to notice the bins of onions and apples. They weren’t as pretty as the greens I had in hand but I couldn’t get myself to leave without some cold storage action.

Together, they make a ‘sort of spring’ salad that is fresh and light but with a little nod to the delicious fruits and vegetables of fall and winter. The apples and onion also add a more serious crunch that really holds up to the richness of the goat cheese.

I am very excited for the spring foods to come out but in the meantime, I plan to enjoy the comforting local foods of the past few months. I may even try to unlock the lost levels in the 4-4 fire world in Super Mario Brothers. Does anybody remember how to do that?


Interim Salad with Apples, Red Onion and Goat Cheese

Farmers Market Bill $12/4 Servings= $3/Serving

Mince small clove of garlic and place in mixing bowl

Add 2 tablespoon of balsamic vinegar and a half a teaspoon of Dijon mustard

Whisk in a 3 tablespoons of good olive oil

Add a pinch each of salt and black pepper

Peel and slice a large red onion

Core and slice 2 tart apples (granny smith work well)

Place onion and apple in bowl with dressing and add 6 oz. of baby greens

Toss to coat well and plate

Check salad for seasoning again and adjust if necessary

Break apart 3 oz. of local, fresh goat cheese and spoon on top of salad

Good Tomatoes in Great Gratin

Good Tomatoes in Great Gratin

I found a Vanilla Ice CD on Ebay for $.01. I can’t think of anything else that costs so little, but apparently that’s all a recording of a past-his-prime pop star can command these days. The tomatoes hanging around the farmers market this time of year in the Northeast, if there are any at all, are not as pretty as they used to be. They are like old pop stars now past their primes, and upstaged by the fresh heirloom kale and beets now making their way up the charts. But I sometimes take pity on the little guys. And while I probably wouldn’t serve them plain (as I might in the summer), they have great potential that can be easily realized in the right dish.

A Tomato Gratin is a great way to welcome the cooler weather. Last year, I wrote about different ways to use leftover breadcrumbs in The Breadcrumb Diaries and one of my favorite uses to this day, is to use them to top gratins of different kinds.

This gratin is very simple to make and very easy to shop for. If you don’t see tomatoes at your market, try asking your farmer. She might have some in the truck waiting for a good home. If she does, grab 5 or six of them, preheat your oven, and get ready to play that funky music.

Tomato Gratin

Preheat oven to 400

Heat a tablespoon of olive oil over medium heat in a small skillet

Chop a large onion and sauté for 10  minutes or until very soft

Slice 5 or 6 large tomatoes and set aside (these can be red, yellow, or even green)

Grate 4 ounces of firm, sharp,  local cheese into a bowl and add ¾ cup of breadcrumbs

Drizzle olive oil into a 9 x 9 inch baking dish

Layer tomatoes along the bottom

Add a teaspoon of the sautéed onions

Sprinkle the first layer with a pinch of salt, a bit of pepper, and a tablespoon of the breadcrumb mixture

Drizzle with a bit more olive oil

Repeat until tomatoes reach the top of the pan

Use remaining breadcrumbs and cheese to top the tomatoes and finish with a final drizzle of olive oil

Bake gratin for 15 minutes

If top is not brown, increase heat to 450

Bake for another 10 minutes

Let cool for at least 20 minutes before serving

Grass-Fed Beef Stew with Root Vegetables and Atrocious Knife Skills

When it gets really cold out, we sometimes slack off a bit. We might hit the snooze button a couple extra times or procrastinate when we have to do our chores. For me, my knife skills go down the drain as the temperature falls. My knife skills aren’t that great to begin with, but I can make pretty uniform slices for a gratin and I can even fillet a fish pretty well. But that’s for warm weather. In the cold, I put ingredients on the cutting board and bat them around with my knife as if they are little cat toys. Eventually, I notice that everything is a bit smaller than it was when I began and that seems to be good enough. Into the pot it goes!

I exaggerate a little of course but there are days when I don’t want to spend much time prepping. I noticed some stew meat at the farmer’s market from New York Beef. I like these folks because they like to talk about how their meat changes with the seasons. Sometimes the beef is better marbled than other times and sometimes there are cuts that seem to be especially good that very day. They also do a great job aging their steaks which makes the flavor of their beef even richer. I believe the stew meat is pieces of chuck but I’m not sure. This recipe can be made with most cuts although I would save the more pricey tenderloin and strip steak for a different dish.

I had no beef stock on the house but I had a batch of turkey stock in the freezer leftover from the holidays. If you’re using good quality poultry bones and trimmings, your stock will be plenty rich enough for the stew. I also had around a third of a bottle of red wine that needed to be used up. Good enough. Most of us have plenty of root vegetables available to us this time of year as well as good potatoes. If your farmer has turnips, go for it. If he or she has only celery root, that works well here too. Follow your farmer’s lead and get ready to do some sloppy prep work.

So with some grass-fed stew beef, some winter veggies, frozen stock, and some VERY poor knife skills, I knew I had a good cold weather meal in my future. When it warms up, I’ll be ready to chiffonade some basil, but until the temperature breaks 0 degrees, I’m happy hacking away.

Grass-Fed Beef Stew with Root Vegetables and Atrocious Knife Skills (Farmers Market Bill $15/6 servings = $2.50/serving)

Heat 2 tablespoons of olive or vegetable oil in a frying pan on high heat

Season around a pound of stew meat salt and pepper and dust with flour

Brown the meat for 2-3 minutes per side and transfer to a dutch oven (if necessary, brown the meat in batches to make sure it all gets good color)

Using poor knife skills, chop 1.5 pounds or so of carrots, turnips, onion, celery root, potatoes, and parsnips or any combination

Add another tablespoon of oil to the pan and brown veggies for 7 minutes or so stirring occasionally (they’ll pick up some of the meat flavors)

Transfer veggies to the dutch oven

Deglaze frying pan with 2 cups of stock and a cup of red wine, scrape the bottom of the pan to make sure you get the yummy bits

Pour stock/wine mixture into dutch oven with another 4 cups of stock

Add 3 bay leaves and 2-3 whole, peeled garlic cloves, and a hefty dose of salt and pepper

Simmer on stovetop over low to medium heat or place in oven at 200 degrees

Simmer uncovered for 3 hours or longer if you can

Taste again for seasoning and salt and pepper again if necessary

Serve with some toasted ciabatta

The leftovers are even better

The Bread Crumb Diaries Part I ($1.25/Serving)

I was cleaning my kitchen today and I noticed my cutting board was covered with Bread Crumbs from a loaf of sourdough I had sliced up earlier. As I began to scrape the crumbs into the garbage, I had a realization: Breadcrumbs are useful and should be treated with respect. Hanzel and Gretel certainly wouldn’t have thought of throwing their breadcrumbs away, especially if they were working on a blog about sustainable eating. So with a small bag of breadcrumbs now in the fridge, I’d like to see how many dishes can benefit from a handful or two of breadcrumbs.

Italian vegetable dishes often use breadcrumbs to give them a bit more texture. The American version may be mushrooms stuffed with a huge amount of breading but there is a more moderate (and tastier) way to do it. Start by melting a couple teaspoons of butter from in a skillet and then add a handful of crumbs. Turn the heat to medium/high or so and watch for the breadcrumbs to become toasty. When they start to color a little bit, remove them from the pan and saute whatever greens you have around. I have winter kale tonight (delicious) but you could use almost any leafy veggie. To be honest, I’m more excited to add breadcrumbs to spring and summer veggie dishes but we’ll come back to that in a couple months. For now, enjoy your kale and try not to throw too many yummy things away as I almost did.

Sauteed Kale with Toasted Breadcrumbs

Heat 2 teaspoons of butter or olive oil in a skillet and add a small handful of breadcrumbs

Add extra fat if mixture looks too dry

When crumbs start to color, remove from pan.

Add a drizzle of olive oil and 2 cups of chopped kale. Sautee for 3 minutes or so.

Salt and pepper to taste, add a splash of white wine and cover for 2 minutes or so.

Add toasted crumbs and toss with the kale.

Taste again. This might be a good place to add splash of vinegar, some extra wine, or a few shavings of local, firm, cheese.

Eat well.

Winter Salad

I’ve read a lot of articles about how winter salads are every bit as good as those you find in the summer. I’m still not sure I will ever like anything more than a salad of in-season tomatoes, baby greens, and a few shavings of local pecorino. But there are great salads to be had in the winter, even here on the East Coast. Windfall farms, at Union Square is a fairly expensive but excellent vendor of various radishes and sprouts year round. http://windfallfarm.blogspot.com/ Most recently, I noticed beautiful watermelon radishes and sliced them thinly along with some blanched kale. With a simple vinaigrette, this is the base of a wonderful winter salad. I also use their gorgeous sprouts when they have them for garnishes at fancy dinner parties. Some of their produce is simply stunning.

Blanching or parboiling are not difficult cooking techniques. I use these methods for everything from winter greens to thinly sliced parsnips. I wonder if we got in the habit of boiling a small pot of salted water as soon as we got home, if we wouldn’t realize that we can eat a lot more veggies than we realized. If you happen to be on the East Coast, buy some root vegetables (parsnips, carrots, celery root, etc), chop them into small pieces and put them into your boiling water. Taste it after a minute and see if it’s too firm for you. If it is, let it go another minute. This is not hard to do. Toss the blanched vegetables with olive oil and vinegar and see what happens. I know I’ve started to enjoy the crunchiness of winter vegetable salads. Those vegetables are delicious and very good for you. They are also cheap. If you can commit to eating mostly root vegetable salads for a few weeks, you can save some cash for those heirloom tomatoes which will be here in a few months. And yes, I am counting the days. : )